Beginner's Guide to Mambaforge Installation
A Mambaforge installation guide based on Jeremy Howard's 2022 Walkthru 1 lesson.
- 1. Check if Python is already installed in your system
- 2. No existing Conda environment in your home directory
- 3. No ipython and jupyter installed in your System Python
- 4. Download Mambaforge
- 5. Install Mamba
- 6. Install Pytorch and Jupyter
-
We will be using the Linux shell to install Mambaforge. For Mac and Windows users new to using the terminal, refer to the following:
-
For Mac Users, refer to Apple’s Terminal User Guide
-
For Windows Users, refer to Microsoft’s Install Linux on Windows with WSL.
-
1. Check if Python is already installed in your system
-
Most of the time, you will find an existing version of Python already installed in your machine. This is the System Python, which is used by your system.
user2022@ubuntu:~$ python Python 3.8.10 (default, Mar 15 2022, 12:22:08) [GCC 9.4.0] on linux Type "help", "copyright", "credits" or "license" for more information. user2022@ubuntu:~$ which python /usr/bin/python -
This is not the Python we want to be using. We want to install a separate version of Python. Which Python you install is going to make a difference in making how easy everything is. Mambaforge is the recommended way to install Python for this course.
-
Next, make sure you are in your home directory by typing the command
cd
Use the commandpwdto print out the directory you are currently in. In the example below, the home directory is/home/user2022@ubuntu/user2022@ubuntu:~$ cd user2022@ubuntu:~$ pwd /home/user2022@ubuntu/
2. No existing Conda environment in your home directory
- If, in your home directory, there is any conda environment such as Anaconda, Miniforge, Mambaforge. etc, delete them. If you are unsure about deleting them, move them somewhere else.
-
In the example below, there is an existing miniconda in the home directory, If you are confident, you can run
rm -rfto remove permanently the conda environment. Note that when you runrm -rfon a directory, all files and sub-folders will be removed permanently.user2022@ubuntu:~$ pwd /home/user2022@ubuntu/ user2022@ubuntu:~$ ls miniconda user2022@ubuntu:~$ rm -rf miniconda -
If you are unsure about removing the conda environment, you may want to keep it. One of the ways, for example, is to use the command
mvto rename it.user2022@ubuntu:~$ pwd /home/user2022@ubuntu/ user2022@ubuntu:~$ ls miniconda user2022@ubuntu:~$ mv miniconda miniconda.old
3. No ipython and jupyter installed in your System Python
-
Ideally, there should be no ipython and jupyter in your system Python. Running the command
ipythonandjupytershould give you error messages that both of them can’t be found.user2022@ubuntu:~$ ipython Command 'ipython' not found, did you mean: command 'ipython3' from deb ipython3 (7.13.0-1) command 'bpython' from deb bpython (0.18-3) Try: sudo apt install <deb name>user2022@ubuntu:~$ jupyter Command 'jupyter' not found, but can be installed with: sudo snap install jupyter # version 1.0.0, or sudo apt install jupyter-core # version 4.6.3-3 See 'snap info jupyter' for additional versions. -
If they are already installed, you can remove them by running
pip uninstall ipythonandpip uninstall jupyter. For example,user2022@ubuntu:~$ sudo pip uninstall ipython Found existing installation: ipython 8.4.0 Uninstalling ipython-8.4.0: Would remove: /home/user2022/.local/bin/ipython3 /home/user2022/.local/lib/python3.8/site-packages/IPython/* /home/user2022/.local/lib/python3.8/site-packages/ipython-8.4.0.dist-info/* /home/user2022/.local/share/man/man1/ipython.1 Proceed (y/n)? y Successfully uninstalled ipython-8.4.0 -
If you are unable to successfully uninstall them, you might want to remove them using
rm -rf.For example, if the ipython in your system Python stubbornly refused to be uninstalled, you can find out where are its files stored, and then remove them permanently.
  user2022@ubuntu:~$ which ipython
  /home/user2022/.local/bin/ipython
  user2022@ubuntu:~$ rm -rf /home/user2022/.local/bin/ipython
  user2022@ubuntu:~$ which ipython
  user2022@ubuntu:~$
4. Download Mambaforge
-
Create a new directory and name it anything that you like. Below we named it
downloads. Change directory todownloadsby typingcd downloads.user2022@ubuntu:~$ mkdir downloads user2022@ubuntu:~$ cd downloads user2022@ubuntu:~/downloads$ pwd /home/user2022@ubuntu/downloads -
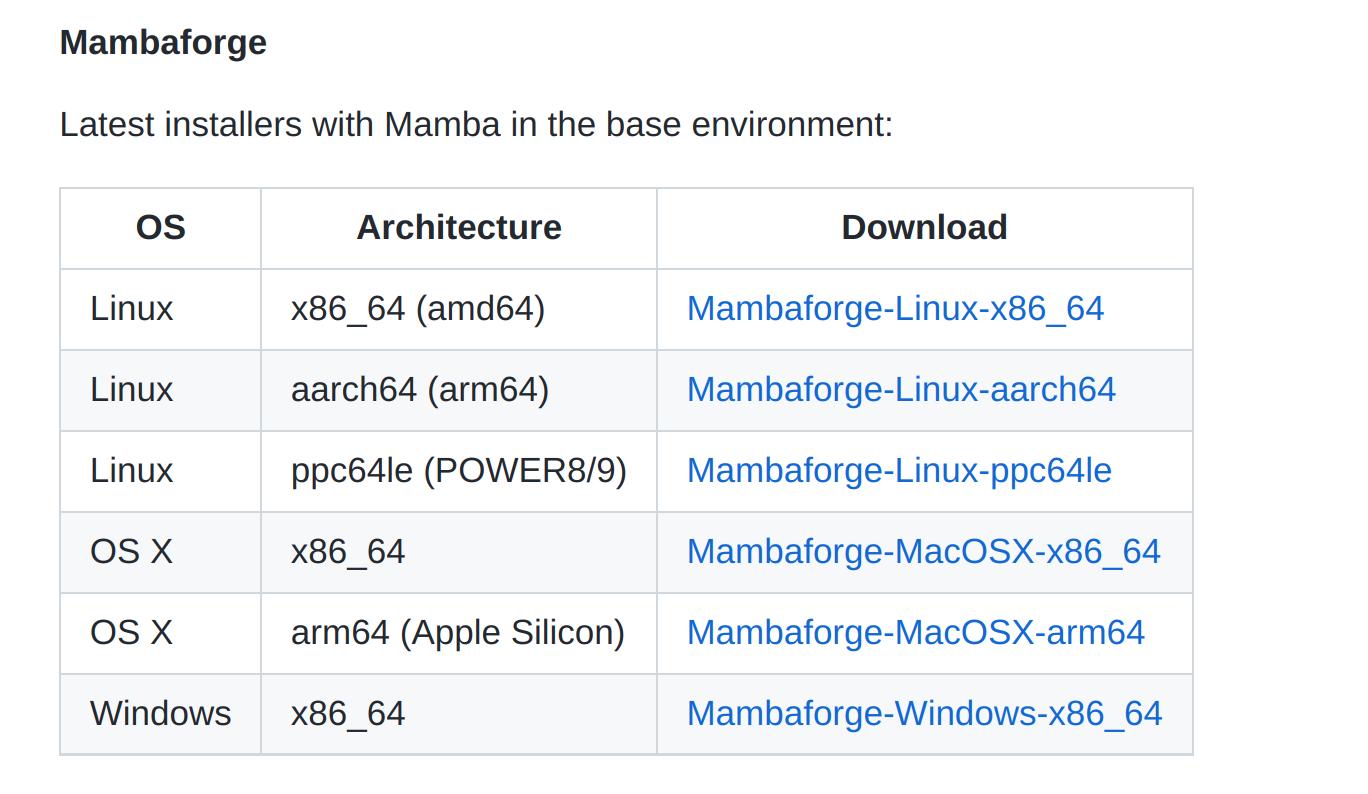
Click on the following link to visit Conda-forge’s Github page: https://github.com/conda-forge/miniforge
-
Scroll down the page until you see Mambaforge.
-
Select the relevant Mambaforge installer for your OS and Architecture. Mouse over the download link to Copy the link address

-
Type the command
wget, then paste the download link you have copied from the previous step. This will download the installer, which is a shell script, from the copied link. Once successfully downloaded, the shell script ending with .sh should be in the folder.user2022@ubuntu:~/downloads$ wget https://github.com/.../Mambaforge-Linux-x86_64.sh user2022@ubuntu:~/downloads$ls Mambaforge-Linux-x86_64.shWhat's inside this Mambaforge shell script?
To look at what is inside this downloaded .sh file, run the following command:
less Mambaforge-Linux-x86_64.sh
Note that the filename may vary, depending on which file you'd downloaded. You will see the commands that shell will run, line by line, to install Mambaforge.
Press the letter q to quit reading.
5. Install Mamba
-
Let’s install Mambaforge by running the shell script using
bash.user2022@ubuntu:~/downloads$ bash Mambaforge-Linux-x86_64.sh -
This will start the installation process. You should see the following messages in your teminal.
  Welcome to Mambaforge 4.12.0-0

  In order to continue the installation process, please review the license
  agreement.
  Please, press ENTER to continue
  >>>
Type
yesto accept the license terms.Do you accept the license terms? [yes|no] [no] >>> yesPress
Enterto confirm the location of the installation. Note that by default Mambaforge will be installed in your home directory. In the example below, that location ishome/user2022@ubuntu/mambaforge.Mambaforge will now be installed into this location: /home/user2022/mambaforge - Press ENTER to confirm the location - Press CTRL-C to abort the installation - Or specify a different location below [/home/user2022/mambaforge] >>>Type
yesmake the installer initialize Mambaforge. Next time when you open your terminal, the python environment will be set up automatically for you.Transaction finished installation finished. Do you wish the installer to initialize Mambaforge by running conda init? [yes|no] [no] >>> yesOnce conda init is done, it will ask you to close and restart your terminal. If the installation is successful, you will see the word (base) appearing in front of your shell prompt, upon restarting the terminal.
Notice that if you type the commandwhich python, it will now show a Python that is different from the system Python from Step 1.(base) user2022@ubuntu:~$ (base) user2022@ubuntu:~$ which python /home/user2022/mambaforge/bin/pythonHow do I get out of this Python environment?
Use the following two commands:
- mamba deactivate: to get out of the environment
- mamba activate: to get back into the environment
6. Install Pytorch and Jupyter
-
Now that our Python environment has been set up, we can start installing softwares that we need for doing deep-learning, such as jupyterlab, ipython, pytorch …etc.
It’s especially important to have good Pytorch and Jupyter installation on your machine. The recommendation is to use
mamba installwhen installing both of them, as it will give you a more optimized installation in a faster, fuss-free manner. -
Installing Pytorch: on Pytorch’s Install Pytorch page, select your preference. The example below installs a cpu version of Pytorch, and assumes that there is no GPU on your laptop. If you have GPU on your machine, select the relevant CUDA version instead. Notice that it is however using
conda install, which we will replace withmamba install.(base) user2022@ubuntu:~$ mamba install pytorch torchvision torchaudio cpuonly -c pytorch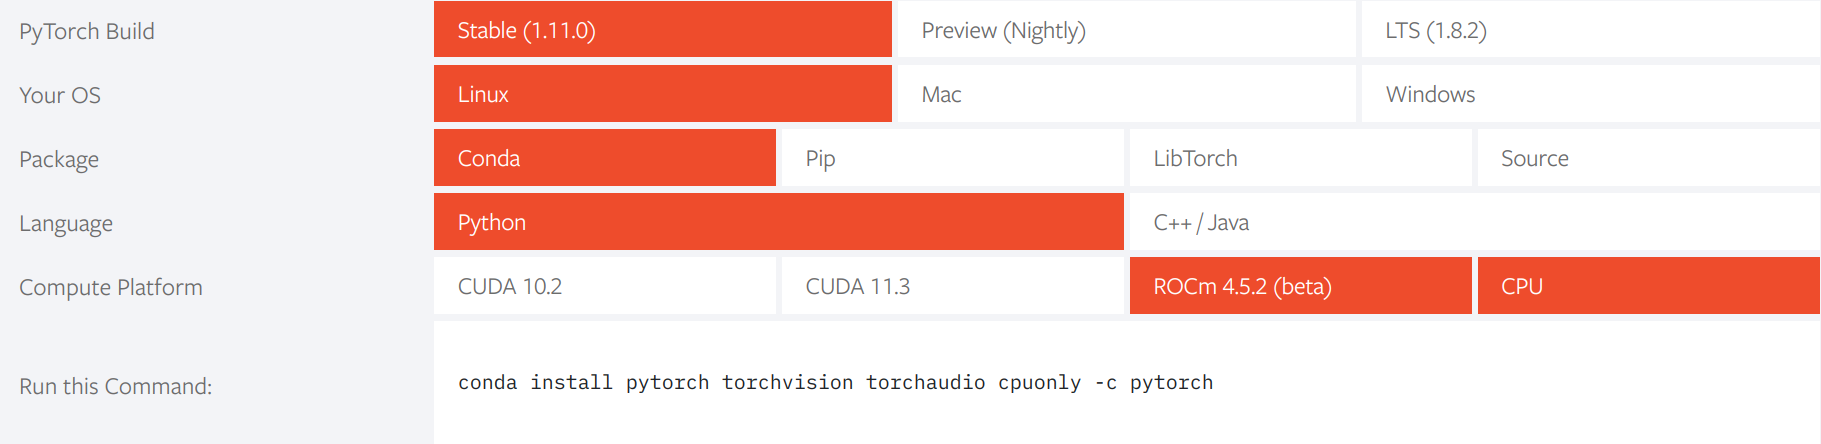
-
Installing Jupyter Lab: on Jupyterlab’s Installation page, the installation command is
mamba install -c conda-forge jupyterlab. Since the default channel for mamba is already conda-forge, we can simply ran(base) user2022@ubuntu:~$ mamba install jupyterlab -
That’s all. Have fun!
(base) user2022@ubuntu:~$ jupyter lab -
P.S. After running
rm -rfa few times and removing permanently files you shouldn’t, you’ll get used to it. I did.